Showing posts with label Photoshop. Show all posts

One Of The Reasons Why You Should Shoot RAW ?


Why I always Shoot Raw ? and here's one of the reasons;
because I'm not always having a good lightening source so shooting RAW give me ability to fix my shots later on Lightroom and bring back details into the dark areas and lighten my shots by increasing exposure unlike JEPG images that has very limited range of flexibility. 

The video below showing how I turned a dark Shot into a good lightened image. 

" It's not a tutorial video " but I hope it would be helpful !

How To Create Your Own Watermark

   
     Since we're publishing our art everywhere on web and can't control who can use it, and no one like to see his/her photo being claimed as others work. 

Watermark or copyrights help a little to prevent others from stealing your efforts, or at least make it difficult for them to erase your name. 
I found many ways to add a watermark and I'll list few for you to try them out !

Method 1 : Text tool Watermark in Photoshop
Method 2 : Brush Watermark in Photoshop
Method 3 :  Plug-in Watermark in Photoshop
 

DETAILS

Method 1 : Text Tool 

Step 1 : 
Choose Text Tool ( T ) 


Step 2 : 
Pick your favorite font 
and start typing your watermark 


Step 3 : 
 You can re-position and re-size your mark by the Move tool 


Step 4 :
 Decrease Opacity to make a transparent watermark


Method 2 : Brush Watermark

 
Step 1 : 
Open Photoshop then go to " File > New " 


Step 2 : 
Select the below setting for your new project then click "OK": 
Width: 1000 Pixels
Height: 1000 Pixels
Res : 300 Pixel/Inch
Background : Transparent


Step 3 :
With text tool ( T ) and after choosing your font write down your text


For adding another text below or somewhere first click on the check mark [✓]


Then while you still using the text tool click where you want to type another text.


after you're done click on the check mark again [✓]

Step 4 : 
Choose the crop tool 


Select your text 


Then click the check mark [✓] or press " Enter " on keyboard 


Step 5 : 
Go to " Edit > Define Brush Preset "


Then name your watermark and click OK 


Now your Bush is ready to use !

Step 6 : 
Open your image then click on brush tool


Right click anywhere on your photo and go down to the end of your brushes you will find your new brush, click on 


Change opacity by the slider above the image


Or by the Opacity slider above layers, while you're selecting the watermark layer.


And you can change the color of the watermark 


resize your brush and click on the image where you want your watermark to be 


Method 3 : Watermark Plug-in 


I recently found a helpful watermark plug-in from Russell Brown. [ Download Link ] 
ٍScroll down into Russell Brown site you'll find a link of tutorial video beside " Adobe Watermark Panel 2.2.2 "
I still didn't use it but it's easy, download it and start discovering. :love: BTW it's FREE la in love 


:bulletpink::bulletpink::bulletpink: This post Published first on DeviantArt by me for my group Support-beginners


Thanks For Reading
Little Pixel Heart 


How To Use Photoshop Actions !


What is a Photoshop action?

Photoshop action is a recorded photo editing steps, using Photoshop. Many people recorded their own editing steps and share it for public to use.
In DeviantArt.com,  Photoshop actions are really popular among photographers, Some are free to download and use. 
Photoshop actions usually come as a RAR/ Zip file. 

How to download a Photoshop Action? { On DeviantArt.com }
Step 1 

Search for Photoshop actions


Step 2  
Pick your desired action click on, then click on the download button on the right 


Step 3  Press on "Download"  button and choose a folder to save in. Then press "Save"


How to use a Photoshop Action?

Step 1 After downloading the action, go to the folder you saved the action file in.
then right click on the file, then Extract to... 


and it should be like this 


Step 2
 
Open Adobe Photoshop and open a photo.


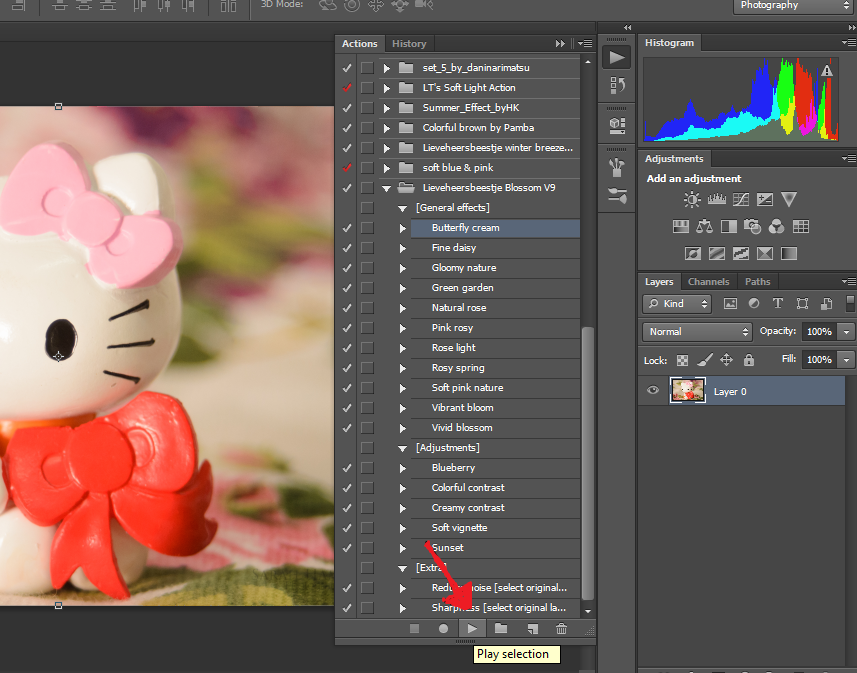
Step 3  Go to " Window" then " Action "


Step 4  New window on the right will be open. press on the little arrow on the top right corner


Step 5 Go to " Load actions" and click on

Step 6  Go to the folder you saved and extract the action file in,

double click on the folder then click on the "atn" file then click " Load" 


Step 7 Go to your background layer double click on to unlock. new window will open click "OK"


Step 8 Select the action you want then click on the " Play"  arrow in the bottom to apply and watch changes 


The Result


How to record your own Action ?

Step 1 Open the actions window same as in the step 3 above 
Then click on the folder shape below under the actions lists to create an " action Set "


Then name the set and click " OK"

Step 2  Click on the fold Paper shape to create new action


Name your action and click "Record"

The Red dot will be on


Step 3  After editing your photo all the steps will be recorded click on the square " Stop" button and you're DONE 


*Action used Here
* Photo credit @ Sarah Hamid Link 


How to add a lens flare tutorial (Photoshop CS6)

Sometimes it's not easy to catch the sun into your shot frame and get the perfect flare, but Photoshop & lens flare feature helping a lot, and you can control the shape, size and brightness of your flare.
I used to use lens flare on my photos," but not lately"  it gives a pretty touch, you only have to put it into the right way (you have to notice the shadow).
So let's get started:

      1-   launch Photoshop and open your photo

------------------------------------------
   2-  Go to Image>>new>layer or on the very right bottom corner will find a paper on the left of a trash cane 

---------------------------------
   3-  press shift+f5 to open fill layer window choose black from the list then OK 

-------------------------------

  4- Go to filter menu>Render>Lens Flare

--------------------------------
  5-  now you have options of flare shapes, brightness, and a preview window, you can notice a + on the flare, click on it and move it to the position you want. my selection was 50-300mm and brightness 151. then click OK.
-------------------------------
  6- To make the flare look more natural, add a little of blur Go to Filter>Blur>Field Blur
   You have three ways to control the amount of blur you prefer. then click OK.
-----------------------
  7- Change blending mode to " screen" , you can also control the opacity, you can find it on the right.


TA DA that's it 


I played a little bit with Curves and Selective color and it turned like the below picture 


I never published this photo because I don't like it, I used it here just for tutorial purposes :)